Tuesday, January 31, 2012

Josef Frank

Browsing around this blog I found a great post about Josef Frank prints.

I haven't heard of him before but after looking him up after, I probably should have. An architect, designer and artist, he spent most of his life in Stockholm, Sweden and was primarily working with public housing and housing estates. Contrary to most other architects during the interwar period, he favoured practicality and functionality over facade decor. In the later years he also designed furniture, furnishings, fabrics, wallpaper, carpets and wall art for which he is arguably more famous for.

The prints are now extremely hard to get hold of and if you are lucky enough to find one, you'd expect to pay a handsome amount for it (at least £150 per metre).

Every print I look at I fall in love with. So colourful and vibrant. I have a vision of a stark white bedroom, white soft furnishings with only hints of colour on piping and borders and then with a long, plump, Josef Frank cushion at the top of the bed hogging all the attention.

But of course, you don't need to splash out the get the look. There are hundreds of imitations on the high street.
Throw pillow, Ikea £19.99
Pair of curtains, Ikea £12.99

Tropical quilt, Urban Outfitters £100

Rug, Urban Outfitters £35

Throw, Urban Outfitters £45

Monday, January 30, 2012

KARL

I attended the Net-a-Porter shopping launch of Karl Lagerfeld's new cut-price collection on Wednesday in a very gloomy Covent Garden.

Arriving 30 mins before opening time, I wasn't surprised to see a lengthy queue. The collection has been hotly anticipated with prices ranging from a modest £50 for Karl's signature leather gloves to just under £1000 for a black leather jacket.

Net-a-Porter had set up an adorable coffee van serving free drinks to chilly queuers and three large shop windows where you could try to win items from the collection by taking photos with their KARL app. They were also giving away a fabric tote bag with Karl's iconic silhouette emblazoned on front and a commemorative "Karl Addict" t-shirt. The first 50 to turn up were also given a gift from the collection in the form of a collar.

There was quite a hoo-hah surrounding the event with large displays of black balloons, three hunky models dressed as Mr Lagerfeld and Net-a-Porter's very own online TV channel interviewing attendees. However, what they failed to bring a long were the actual clothes. The shop windows were covered with large photographs of models wearing the collection but the pieces themselves were nowhere to be seen. I expected for them to be at least on display, after all, that's what we were all there to see.

As for the collection, I like it. But that's it. Of course it is based on Karl's classic monochromatic colour palette with lots of tailoring and starched shirts but I can't help feeling that it's all a little 'imitated'. I mean, the clothes Karl designs for Chanel, Fendi and his own line are superb but that doesn't necessarily mean that we want to dress like him. And I think you could quite easily get the KARL look with many items already in your wardrobe or by investing in one or two pieces (a black tux jacket, a tough leather jacket) without having to buy the collection itself. Of course it sold out in minutes simply because of the label attached but if you missed out this time, it doesn't mean you can't get the look.

The queue


Hunky Karl models - not really sure what the point of them being there was. Except to look gorgeous.

Coffee van

The windows

The windows

Ok at least I got a free coffee

Sunday, January 29, 2012

Red Velvet Cupcakes


Last week I found myself with an excessive amount of free time. And what did I decide to do with it? Bake!

This time it was red velvet cupcakes with a cream cheese frosting. I used this recipe from the Hummingbird Bakery book.

There's something about a red velvet cake that is just so enticing. It doesn't even have a very distinct flavour but I think that sumptuous red just blinds our tastebuds.

The recipe was very easy to follow and the cakes turned out exactly as it said they would. Well apart from the fact I under baked them by a few minutes (sorry Paul Hollywood...). But other than that, the colour was extremely vibrant - which can be touch and go with red velvet - the sponge a good texture and the frosting was deliciously smooth and tasty. It also made nearly the exact amount I needed without having bundles of excess which I hate.

Oh and here's another tip I learnt last year from the charming little cake shop near my house, instead of cluttering up your kitchen with numerous shaped cake tins, just buy a selection of silicon cases in different sizes. They hold up just as well as a tin, you can bake more at one time and they take up far less space in your cupboards.


Thursday, January 19, 2012

♥ 3 Things

I've had a few days off and even though they've been riddled with sinus congestion = sleepless nights, I've had a bit of time to rest.

Since I haven't ventured out much further than a yoga class and the supermarket, I've taken pleasure in the considerably more simple things in life.

Now there are a million and one things I'm supposed to do today (clean, tidy, organise, post office, clean some more) but catching up on Masterchef sounds like a much better idea.

Beautiful sunset

Drinking the last of the Christmas champagne (with OJ)

My first daffodils of the season and a dreary winter's day - I don't think I'll even bother getting out of bed.

Saturday, January 14, 2012

How to: Leather Dyeing

My beloved Bimba & Lola wallet was looking a bit haggard. I've had it a few years now (it was a lot of money when I bought it) and there was nothing wrong with the clip or hardware but the leather had worn and the colour faded so I had two option: throw it away and buy a new one, or, try to rescue it. Since I didn't have anything to lose, because as it was I didn't want to use it anymore anyway, I decided to go for the second option. And if it didn't work out, well I could just buy a new one anyway.

You might be wondering why I even bothered with the hassle of trying to re-dye the leather but it's because I truly love this wallet. I've tried to find others that compare over the years and none have even come close. Even Bimba & Lola don't sell this style anymore. I love the "box clutch" way it opens and closes and the numerous pockets and zips and card holders are indispensable for me. It even doubles as a clutch when I just want to run to the shops. Compromise was simply not an option.

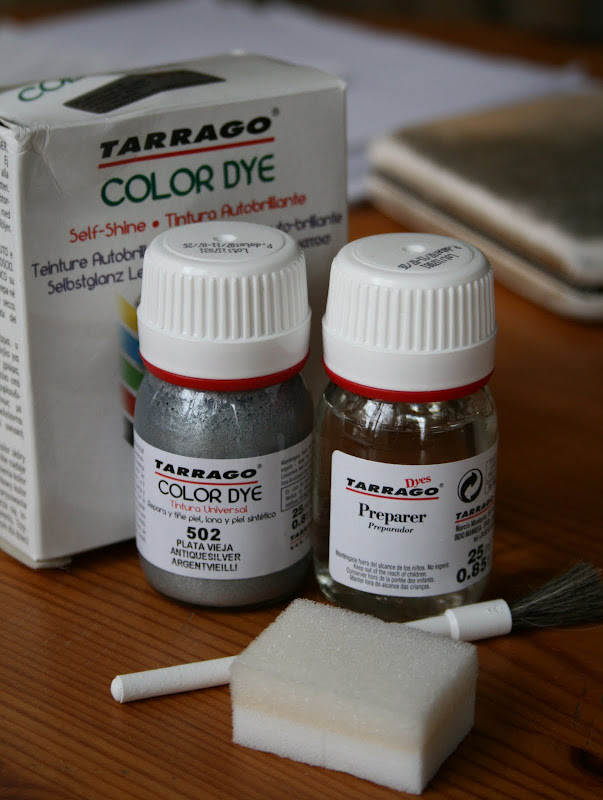
So I set about trying to find out how to dye the leather. There are so many different products out there but I didn't want to spend a fortune or pay to get it professionally done because then I might as well just have bought a new one. I found a few forums explaining how to do it, success (and failure!) stories and helpful tips and ended up buying a leather dyeing kit by Tarrago (£7.50-ish) which promises to keep the leather supple, be colour-fast and even dye white on black.

My wallet used to be an interesting metallic mix of gold and silver and I tried to find this colour again but no such luck. Next time though I might consider mixing my own. I considered nude but since I wasn't familiar with the process, decided to play it safe and so I went with Antique Silver which is the best match to the original colour I could find.

The kit comes with a leather preparer liquid, small sponge and paint brush. TIP ALERT: The sponge and paintbrush they supply are really pants (hairs coming out all the time, fairly hard sponge texture) so I would recommend either using a good quality make-up brush or paint brush and a softer, bath sponge cut to size. These would have made the process much easier to get an even finish. Also, the instructions recommend to do two to three coats but since I was starting from scratch, I found I had to do five - and there was still dye left in the pot.

Rather than ramble on, I'll explain the process step-by-step with photos:

BEFORE


THE KIT

FIRST LAYER

First I taped up all the hardware to avoid smudges. After preparing the surface (dipping an old dish scourer into the preparer liquid and wiping over the surface to remove any dirt/finish), I applied the first layer of dye. It advises to use the brush for edges, near hardware and in small crevices, which I did but found that the brush left a thicker layer than the sponge so had to compensate for that in later stages. Then with a small amount on the sponge, used circular motions to "buff" the colour on.

SECOND LAYER


THIRD LAYER

This is where I felt the dye really starting to show up. The initial two layers didn't make much of an impact but from here you can see a major difference from layer to layer.

FOURTH LAYER

By this point the leather was pretty much done, but there were just a few little places that needed evening out, which I did using the sponge. I found the sponge overall easier to use and I had more control over the amount put on because it adds only a thin layer each time. The brush is a little heavier handed.

FIFTH LAYER - FINAL RESULT


The instructions said to leave it for five hours to dry. I left it over night but if your layers are thin and you leave them to dry completely between stages, it doesn't actually take more than half an hour which is great for impatient people like me.

I'm pretty pleased with it overall. The finish is smooth and still leaves the leather supple and soft. So far there has been no rub off so I'm impressed with the Tarrago kit and would definitely use it again.

Now, what else can I dye??

Thursday, January 12, 2012

Kedgeree

Since we've come back home after the holidays, I'm making an effort to make good, home cooked food for dinner. Pretty much from June until December last year I was either working solidly or combining working part time with uni. It did not make for a happy match. I was tired, stressed and barely had time to think. So, I quit my job and I'm taking a break. Of course I still have uni but my schedule is much emptier since I finished work and I love that I can spend more time on projects. I'm not quite sure how long this will last because inevitably, as I always do, I will get frustrated with having time off and once again throw myself into having too much on my plate, but for now, I'm loving having time to cook, read, bake, write and above all, relax.

It started with a cheesecake, and now it's kedgeree.

It's something we always used to eat for dinner as children - I loved it then and I love it even more now. Simple to cook, tasty and nutritious, it's quickly becoming one of my favourite winter meals.

There are tons of different ways of cooking kedgeree (as I found out just Googling a recipe), some are super complicated and involve lots of ingredients (Jamie Oliver's) and others more simple, but I've tried out a couple and this seems to be the best yet.

It's made almost like a risotto so it turns out quite creamy, but you can alter the time you leave it on the heat for, depending on how wet you want the dish to be.

You can find the recipe here. The only thing I changed was to use single instead of double cream because I wanted it to be a tad lighter on the calorie front. Oh and I use dyed smoked haddock because that's what gives the dish it's yellow colour. That's how we always had it as kids so that's how I like it now.


Monday, January 9, 2012

Today

I've spent most of the day on the sofa finishing uni work and flicking through Spring/Summer catalogues - oh how fun it is to circle EVERYTHING you want. I'm writing a trend piece on S/S's "Under the Sea" trend and I can't wait to show you it when it's done next week.

But I didn't spend the whole day on my backside. I made a kedgeree for dinner which, for those of you who don't know, is a creamy, smoked haddock rice dish. I'll post the full recipe and photos later on in the week.


The S/S 2012 H&M catalogue. Very DVF, no?

Kedgeree

Saturday, January 7, 2012

Cheesecake O'Clock


So we are finally back at our humble abode in South London exhausted after the holidays but also sad that it's all over.

I have a mountain of uni work to do before Tuesday but for a break - and a Saturday night treat - I made a lemon and blueberry cheesecake. After the success of her Christmas chutney, I once again reached for a Mary Berry recipe (below).

The only alterations I did were to skip the whipped cream on top because for me, it's a little cream over-kill and I replaced strawberries for blueberries for the topping. The only other thing I would say it that it didn't set too well. The recipe dictates to use the juice of 3 lemons, but I'm not so sure this is too much since it came out a little on the liquid side. I think next time I will try the zest of say, 5 lemons and the juice of just 2.

The Base: 10 digestive biscuits 2 oz (50g) butter, melted 1 oz (25g) demerara sugar

The cheesecake: 5 fl oz (150ml) single cream 1 x 14 oz (397g) can condensed milk 6 oz (175g) low-fat soft cheese, softened Grated rind and juice of 3 large lemons (tad too much perhaps?)

Topping: 5 fl oz (150ml) whipping cream, whipped Strawberries (I used frozen blueberries since fresh are out of season)

Mix together the biscuits, butter and sugar for the crust. Turn into 23 cm flan dish and press over base and into sides. Leave to set.

For the filling, mix together the cream, condensed milk, soft cheese and lemon rind, then add lemon juice a little at a time, whisking until the mixture thickens. Pour into the flan case and leave to chill in fridge for 3-4 hours or overnight.

Decorate with swirls of cream and the fruit.

PS. Sorry about the ultra naff photo. Even though I only made this at 4pm, I already had to put the (unflatteringly orange) light on because it was almost dark outside. Come on Spring...

Thursday, January 5, 2012

New Facebook Page

I've just created a new Facebook page for the blog to replace the dated last one. Because of the ever changes Facebook makes, it had become difficult to upload photos and find the group in searches, so out with the old and in with the new I say!

You can find the new page here, follow me - you know you want to!

Oh and here's a picture of some cupcakes I had the other day at a lovely little tea room in North London. Check out their website and FB page for more info. I'd highly recommend a latte and a cupcake if you're in the area!


Wednesday, January 4, 2012

Exciting News

As I said last week, I have some exciting projects and plans coming up this year and I can now finally reveal the first one.

I've been holding my breath (and tongue) on this one for a while now but I'm ecstatic to tell you that I will be going to British Vogue for work experience in April.

I just had the interview today which was much less scary than I was preparing myself for and was asked on the spot when I was available.

Now I'm going to retreat back down to the south coast to try to get rid of this dastardly cold and rest for a couple more days until my responsibilities back in the city call this weekend but in the meantime, here's a fabulous photo shot by Patrick Demarchelier of a very demure looking Agyness Deyn for January's British Vogue.

Ta rah for now.

PS. If I manage to get my butt in gear I will be uploading a new look for Maria's Gaga in hopefully the next couple of days.